Vanilla Coconut Milk Recipe

Posted March 20th, 2014 by Danielle Alex

VanillaCoconutMilk2

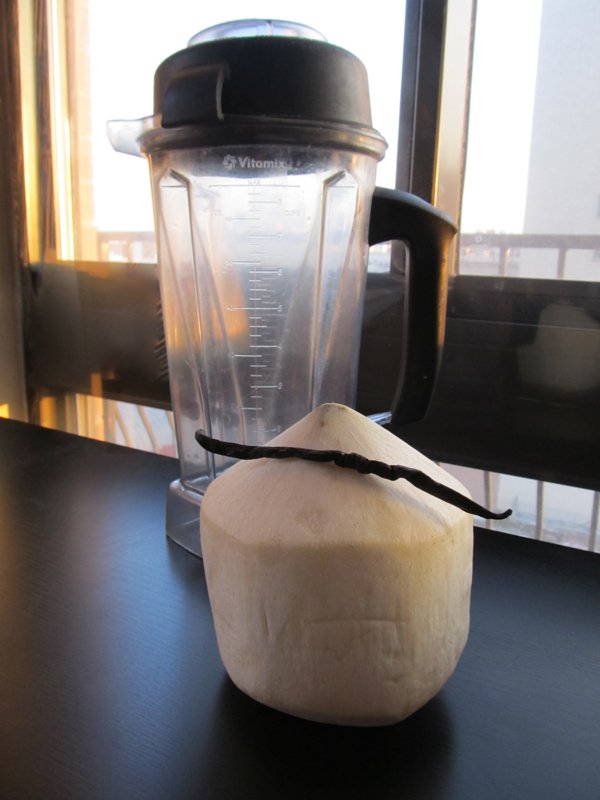
Welcome to one of the most simple recipes ever, raw vanilla coconut milk. This dairy-free milk, is great for everyone! If you are a carnivore, vegan, or vegan-raw you’ll this recipe, and its great for hydrating the body. It only takes two ingredients and the hardest part is cracking the coconut. Some people are a little intimidated by a whole young coconut, but don’t be. Once you get the hang of how to crack the coconut, the recipe really becomes a breeze and you’ll be making this all the time. Trust me when I say, the beverage that awaits you at the end of the journey is literally a taste of paradise!  So without further ado, let me show you how it is done.

Vanilla Coconut Milk

Yield: 1 Serving

Ingredients

1 young coconut

1/2 vanilla bean

Equipment

Blender

Chef Knife

Spoon

VanillaCoconutMilk1

Cracking the Coconut

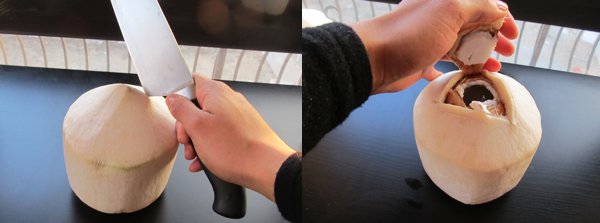
1. It is important when cracking the coconut not to simply cut it in half machete style, because we want to keep the water and the meat. So you start by cutting an opening at the top of the coconut with the heel of a chef knife. I hold the bottom/ flat part of the coconut in one hand and my knife in the other. I make 3 cuts, in the shape of a triangle, into the top of the coconut with the heal of my knife. If it’s easier for you to make 4 cuts, in the shape of a square, this works as well.

2. With the tip of the knife, pry open the top of the coconut and set aside.

VanillaCoconutMilk8

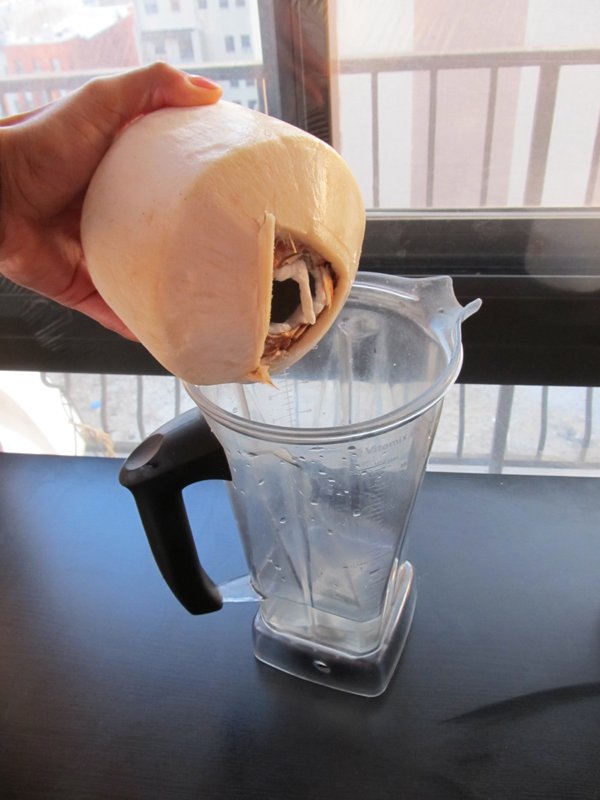
3. Pour the coconut water into blender. Please note, if you hacked the heck out of the coconut and the outer shell is coming apart, place a stainer over the blender before pouring the coconut water into the blender. You don’t want gritting coconut milk.

VanillaCoconutMilk6

4. Cut the coconut in half to remove the meat, the white flesh.

When I cut the coconut in half, I hold the coconut in one hand from the back, rounded side and start cutting from the top opening, down the front. Then I turn the coconut 180 degrees and start down the other side . I give the coconut a test to see if it easily comes apart. Place your fingers in the top opening, thumbs outside, and pull.

VanillaCoconutMilk7

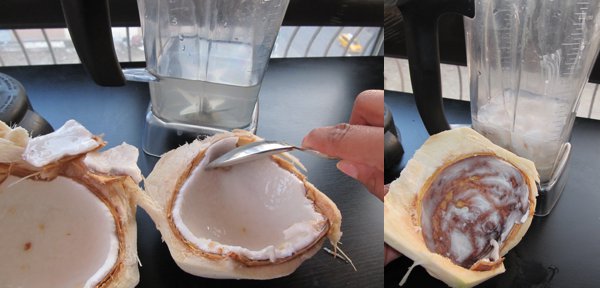
5. Remove the meat and add to the blender. Be sure not to scrape too hard that you are getting a lot of the brown from the coconut shell.

6. Since you are only using half of a vanilla bean for this recipe, store the other half back in the airtight container it came in. Cut the vanilla bean in half lengthwise and scrape out all of the beans and add it to the blender.

Pictures left to right: before blending, after blendingVanillaCoconutMilk5

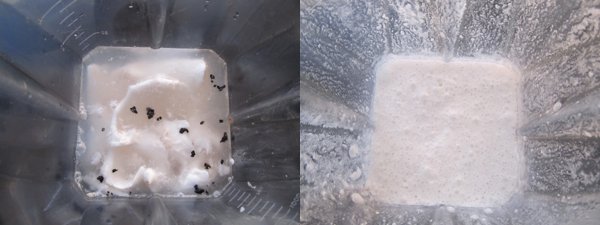
***Fun Tip: Make Vanilla Sugar. Once you remove the beans out of the vanilla pod, do not throw the pod away. Place the empty vanilla pod into a small container with granular sugar. Give it a shake and keep it for future baking needs.

VanillaCoconutMilk3

7. Blend it until smooth, then taste it. If you feel like your taste buds need a little more sugar, you can try adding a touch of agave.

8. Serve and enjoy!

VanillaCoconutMilk4

DanielleAlexChicken

This recipe in particular is designed to make dinner for two simple, cheap and easy. It is also pure comfort food. Sometimes you just want something that is simple, delicious, and easy to make; and this chicken is precisely that!  It not only taste good, but makes the house house smell amazing. A great way to making friends, or if you live in a New York City apartment, enemies in your building via this heavenly smell sweeping through the hallways. You would hate to be a passerby, smell the herbs and garlic infusing into the chicken and not be able to partake in this meal.

Quite often I use compound butter on whole chickens, and roast them. Compound who? Some of you just asked yourself what compound butter is, just continue reading below. It’s a lot easier than it sounds. My mother even loves making compound butter! I showed her how to do this and soon enough everyone in my family was doing it. They somehow ended up naming it “Danielle’s Chicken.” I only wish I could take the credit for creating compound butter and slathering it under the skin of a chicken, but I know that glory goes to the French. Nonetheless I was flattered.

What is compound butter?

Compound butter is butter that has various components added to it, as to impart flavor. You can add herbs, spices and other aromatics to give the butter a unique flavor.  It is best stored in plastic wrap or parchment. You can roll it into a log, chill it and then slice off pieces as needed. Having a block of homemade compound butter in your refrigerator or freezer you can spruce up any dish. Compound butters are great for chicken, fish and steak. You can even try adding some citrus zest to your compound butter. The addition of lemon or orange zest is delicious, especially when used on fish. Feeling fancy? Add some white or black truffle to the butter.

I have a simple recipe for compound butter below. The compound butter recipe makes just enough for this chicken dish. You can always double, triple, etc. this recipe and then put the rest in your freezer. And since you are the one making it, you can add or leave out whatever you so desire.

DanielleAlexCompoundButterGarlicHerbChicken

Garlic & Herb Chicken with White Wine Jus

Yield: 2 Servings

Ingredients:

2 chicken hindquarters (leg & thigh attached)

1 tablespoon olive oil

salt and pepper to taste

compound butter

3 tablespoons softened butter

1 tablespoon chopped rosemary

2 teaspoon chopped sage

1 teaspoon chopped thyme

2 large cloves garlic, minced

½ teaspoon black pepper

¼ teaspoon salt

chicken jus

1 tablespoon minced shallots

1 clove chopped garlic

2 tablespoons dry white wine

½ cup plus 2 teaspoons chicken

stock

½ teaspoon cornstarch


Instructions:

1. Preheat the oven to 425 degrees and make sure the rack is in the middle on the oven.

2.  Make Compound butter: Add chopped herbs, garlic, salt and pepper to softened butter and mix thoroughly.

3. With a spoon place soft compound butter under the skin of the chicken.  Help spread the compound butter around evenly with your fingers, by rubbing the skin and evenly smoothing the butter out. Then season the skin of the chicken with salt and pepper.

4. Place a cast iron skillet on high heat. Once it is hot, add the olive oil and lower heat to medium high.

5. Place the chicken in the pan. Sear the skin until it is golden brown and then flip it.

6. Remove excess oil and place in the oven until cooked all the way through, about 15- 20 minutes.

DanielleAlexCompoundButterGarlicHerbChicken3

Pulling the skin away so I can easily slide the compound butter underneath.

DanielleAlexCompoundButterGarlicHerbChicken2

Be sure to push the butter around so it is evenly disbursed under the skin. And don’t forget to turn it over and place compound butter under the skin on all sides.

DanielleAlexCompoundButterGarlicHerbChicken1

Season the chicken and sear the chicken in a HOT pan with oil. To get a good sear, the pan has to be hot before adding the chicken.

7. Once chicken is cooked, remove from the oven. Take chicken out of the pan and set aside in a warm area. Pour off excess oil in the cast iron skillet. You will make the jus in the skillet.

8. Mix cornstarch with 2 teaspoons chicken stock set aside.

9. Leave enough oil, about 1 teaspoon, in the skillet. Place on stove top, turn heat to medium high.

10. Sautéed the shallots until translucent. Add garlic and sauté for about 30 seconds.   Do not to burn. Lower heat or remove from heat.

11. Deglaze the pan with white wine, scraping the pan with a wooden spoon.

12. Add ½ cup chicken stock, bring to a simmer and add cornstarch mixture. It will thicken when it hits the hot pan.

13. Serve the jus over the chicken with the jus. If you want to keep the skin nice and crispy do not pour directly over the skin.

DanielleAlexCompoundButterGarlicHerbChicken5

Variations

Try adding lemon zest and crush chili flakes to the the compound butter.

Do you love bacon? Try rendering some bacon or lardons in the pan before you make the jus. Remove excess oil/fat then add the shallots and garlic and proceed from step 10.

Give the jus a creamy finish by adding 2 tablespoons of heavy cream at the end. Season with salt and pepper to taste.

The Best Green Smoothie: How to Start Your Day Off Right!

Posted September 27th, 2013 by Danielle Alex

DanielleAlexGreenSmoothie

Breakfast the most important meal of the day. So should’t we start  the day off right, with a meal that is going to give us energy. This smoothie will not only give you energy but jump starts your brain and loads you up with antioxidants. I also I have included some information about a few of the ingredients below. The recipe itself can be found all the way at the bottom. You may look at this picture and say to yourself, “Wow these are a lot of ingredients.” But once you get in the routine of making it, you will no longer need to measure everything out. It really is quick to make and the blender does the work no need for pots, pans, an oven, or a stove-top in the morning.

In the words of lovely Erika, who shared this recipe with me,” Once you start adding this to your diet, you will wonder how you ever lived without it!” Thank you for sharing this with me, I’m ready to seize the day with this smoothie!

Jump Start Your Brain

Spinach, turmeric, cocoa nibs, berries are terrific foods for feeding the brain in the morning. Many of these foods help with blood circulation. Dark leafy vegetables are also great for your memory and are high in folate which help protect to brain. Research has even show that dark leafy greens can help slow the age related decline in brain health. Sunflower seeds are not only a great source of vitamin E but help improve memory. Hence this small addition to your daily smoothie.

Maca Powder

Maca Powder  is the natural energy supplement. It was used by the Incas because this root grew in the Andean Mountains. I use the gelatinized and NOT the raw. Traditionally and even to this day if you go down to Peru, it is cooked first (gelatinized). Some people have even claimed to have digestive issues when they eat raw maca powder. I say when it Rome do as the Romans, so do like the Incas and buy the gelatinized maca. Unlike other products that give you energy, like caffein, it does not give you the jitters or make you crash. It also helps with the following: balance hormonal levels, increase sperm count, menstrual issues and infertility. This however is not one of those products where more is better for you. If you take too much you will most likely end up with hot flashes, therefore you should start small. Start off with 1/3 teaspoon and work your way up to 1/2 teaspoon.

Looking Lower Your Cholesterol?

Almonds and nuts are a great way to lower your cholesterol. Coconut oil still has some controversy over wether or not it is healthy for you, but in many studies it has show to increase HDL, the good cholesterol.  I personally add coconut oil in my smoothie about every other day.

Other additions to the smoothie that can be made for those worried about cholesterol levels include: oats, fish oil, pears, and olive oil. Fiber in general is a great way to lower cholesterol. To reduce the absorption of  cholesterol into your bloodstream, try finding foods that are high in soluble fiber. The Mayo Clinic has a page that is devoted to food and cholesterol. Check it out here.

Yield: 1 16-oz smoothie

Ingredients

10-fl oz. unsweetened almond milk or hemp milk

1 scoop of vegan protein powered (or protein powder of your choice)

1 scoop Greens+ Original Superfood

1 tablespoon goji berries

1 teaspoon cocoa nibs

1 teaspoon sunflower seeds

1/2 teaspoon matcha powder (green tea powder)

1/8 teaspoon turmeric

1/3-1/2 teaspoon maca powder

dash of cayenne pepper

1/2-1 teaspoon coconut oil

1 teaspoon Manuka honey

3-5 almonds

a handful of spinach or kale

1/2 packet of acai berry smoothie pack (frozen)

1/3 cup of fresh or frozen berries

DanielleAlexGreenSmoothie.jpg1

Turmeric & Cumin Red Lentils: Cancer Prevention Food

Posted August 29th, 2013 by Danielle Alex

Chef Danielle Red Lentils

Turmeric & Cumin Red Lentils

Yield: 4- 8oz bowls

Ingredients

1 cup red lentils

4 cups water

1 small onion, minced

4 teaspoons ghee

3/4 teaspoon turmeric

1 teaspoon cumin

2 teaspoons garlic, minced

Himalayan pink salt to taste

sliced scallions, for garish if desired

**Vegan Turmeric & Cumin Red Lentils: This recipe can be made vegan by simply substituting vegetable oil instead of ghee.

chef danielle g alex

I love this recipe for a few reasons. A good friend of mine, Sumati, shared a similar rendition of this recipe with me during our graduate studies. And yes, it’s the same Sumati from Community Culture and Cuisine New Delhi. I remember we were in her small Paris dorm room studio. She taught me an Indian cooking technic that changed my lentil life. This recipe is really is her recipe, or at least how I remember it, except she uses a lot less onions and there are no real measurements.  The garlic is toasted until it is golden brown and the cumin seeds are also toasted in ghee, and then these are added to the lentils after they are cooked. This is the major seasoning component, giving the lentils a slight nutty flavor. So thank you Sumati for sharing this with me and all the joy and laughter we have shared over great food!

Other reasons why this is an awesome recipe:

Protein

Lentils are a great source of protein, along with many other pulses and legumes. For this particular recipe there are about 13 grams of protein in an 8oz serving. If I’m looking for a healthy and delicious meal after a workout I love having this with a nice salad. And since you should have some form of protein 30 minutes after working out, to help build muscle, this is a great option.

Turmeric

It is known to have some anti-cancer properties. It has been said to prevent and slow the grown of certain types of cancer. It is also known for its anti-inflammatory properties. For more check out what the American Cancer Society has to say about it. Turmeric is a great addition to morning smoothies and shakes. It can be found in powder form and fresh. When peeling fresh turmeric use a metal spoon. This is the same technique I use when peeling ginger.

Cumin Seeds

Cumin, another spice that researchers have looked at for its possible ability to fight cancer, because of the high levels of antioxidants it contains. It is great for digestive problems and it has also been suggested that black cumin seeds are great for migraines. Ayurvedic  medicine has been promoting cumin for a while. Check this out: Vedic Healing.

I’m not even going begin on my love for onions and garlic and how good they are for you. I’ll save that for another day. I use them is so many recipes, it’s just part of my seasoning. Now let’s get to business and find out how to make these lentils…

Danielle Alex: Lentils

Directions

1. Place a small pot on medium high heat and add one teaspoon of ghee.

2. Once the ghee melts and is hot, add half of the minced small onions and sweat for a few minutes, until the onions are translucent.

3. Add the garlic and sweat for about 1 minute, until your start to smell the garlic.

4. Add the turmeric to the ghee, onions and garlic. Let toast for about 30 seconds, stirring as not to burn anything.

5. Add lentils, stir.

6. Add water and bring to a boil. Once it starts boiling, reduce heat to a gentle simmer and cook for about 10-15 minutes until the lentils are soft, most of the liquid is absorbed and the consistency starts to thicken.

7.Once the lentils are cooked, remove from heat and set aside.

Seasoning

8. In a separate smaller pot, add the remaining 3 teaspoons of ghee.

9. Over medium high heat, melt the ghee. Hold the pot on its side, positioning the pot so all the oil is the corner of the pot. See image below.

10. Sweat the rest of the minced onions until translucent, and then add the garlic and cumin seeds. You might hear a little popping noise so do not be alarmed.

11. You know the mixture is finished when the garlic starts to brown around the edges. Be careful here, because this is the stage when the garlic can burn easily if you are not careful. Therefore, it is perfectly okay to give it a stir once in a while.

12. As soon as the mixture is finished, add it to the cooked lentils and stir it in until it is evenly distributed. Do not keep the toasted seasonings in the pan they were toasted in, as the pan is hot and the seasonings will continue to brown and burn.

13. Finish seasoning the lentils with Himalayan pink salt to taste.

14. Add chopped scallions as a garnish when serving, if desired.

Danielle Alex: lentils

How to hold the pot when toasting the onions, garlic and cumin for the seasoning. Place it on it’s side, tilting one side of the pot down towards the flame. It should not be so far tilted that the ingredients in the pot are spilling out, over the side.

Danielle Alex: lentils

What the seasoning mixture of onions, garlic and cumin seed should look like when its finished. Once it’s done, immediately add it to the lentils, as not to burn the toasted seasonings.

Danielle Alex: lentils

The toasted cumin seeds, garlic and onions are added to the cooked lentils and stirred in. Season to taste with Himalayan pink salt. Serve and enjoy!

Chef Danielle Red Lentils

Oatmeal & Chia Seed Waffles/ Pancakes

Posted July 25th, 2013 by Danielle Alex
Waffes

Chef Danielle’s Oatmeal & Chia Seed Waffles

Yield: 8, 4” x 5” waffles

Ingredients

1 cup all-purpose flour (or all-purpose gluten-free flour)

1/2 cup old fashioned oats

1 tablespoon chia seeds

1 tablespoon baking powder

1/2 teaspoon salt

1 tablespoon agave (or white sugar)

1 1/4 cup milk (or almond milk)

1 egg

3 tablespoons butter, melted

Ingredients

Why I love This Recipe

I have always loved eating pancakes and waffles in the morning, but I wanted something that was healthier than the old-fashioned pancakes/waffle mix. Henceforth, I got to thinking about what I could add to make them better for you. Chia seeds of course! It’s an amazing superfood, known as runner’s food, because it is loaded with omega-3’s, antioxidants, and calcium just to name a few. There is even protein in chia seeds. Roughly 2 tablespoons contains 4 grams of protein and 11 grams of fiber. I even love putting chia seed in my juice just to add a boost to my day!

But back to the waffles at hand…I decided to add oats as well because they aide in heart health. Oats help lower cholesterol, and since its a whole grain, is another good source of fiber.

I love making this simple waffle and pancake batter the night before. When I do it this way the chia seeds and oats absorb the liquid in the batter, thus making them softer. You then might ask, “Danielle, what do I do if the batter is really thick in the morning?” Simple, just add a little more milk to loosen it up and voila… in the iron they go.

Dry Ingredients

Directions

1. Place all dry ingredients in a large bowl.

2. In a separate bowl, mix together wet ingredients: agave, milk, egg and melted butter.

3. Add wet ingredients to the dry mix, stir until all ingredients are incorporated. If there are a few lumps of  flour in the batter, its okay, you can leave it.

4. Let the batter sit for at least 15 minutes so the chia seeds start to absorb some of the liquid. This batter is even better when made the night before.

5. Heat waffle iron according to instructions and pour batter into hot waffle iron.

6. Serve hot with maple syrup, honey or jam. Enjoy!

Batter

Variations

Gluten Free Oatmeal & Chia Seed Waffles/ Pancakes

This recipe can be done gluten-free and dairy free. Instead of using all purpose flour try using a gluten free flour mix. If you do not want to make your own, one of my favorites is Pamela’s All Natural Baking and Pancake Mix. When using this mix, there is no need to add baking powder. This mix however, does contain almonds and cultured buttermilk powder.

To make sure it is dairy free, use almond, rice, soy or any non dairy milk you so desire. As for replacing the butter? Use vegetable oil, almond oil or walnut oil to give it a nutty taste.

Berry Oatmeal & Chia Seed Waffles/ Pancakes

Try adding fresh or frozen blueberriesstrawberries, or raspberries to the recipe to add to your antioxidants for the day.


Oatmeal & Chia Seed Waffle with Raspberries